Holiday Gift Guide: A Kitchen Edition

I'm a big believer in the idea that you don't need a big fancy kitchen, expensive pots & pans and top of the line gadgets to make fantastic food. I'm super proud of the amount of food that comes out of my little apartment-size kitchen, and I've found acquiring a few simple tools, most of which I use daily, can make a huge difference. So if you're still looking for that perfect stocking-stuffer, a great gift for your favorite cook, or even some starter kitchen basics for a college student, let this be your guide:
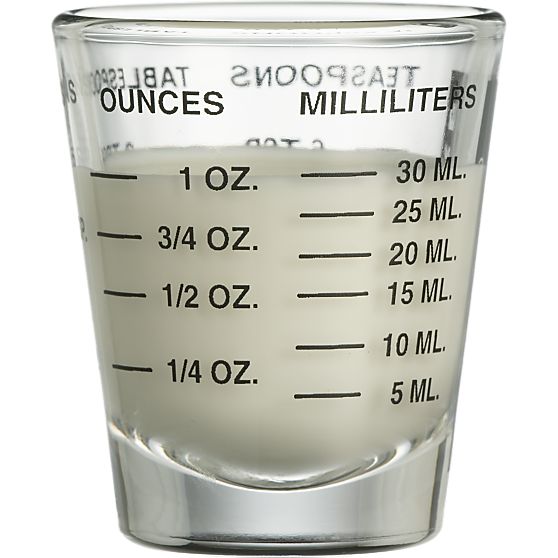
Mini Measure Shot Glass$2.97 (on sale now) - My mom got me one of these last year for christmas and I seriously don't know how I lived without it. I literally use it 365 days a year, usually multiple times a day. For baking and cooking this thing is a gem. 

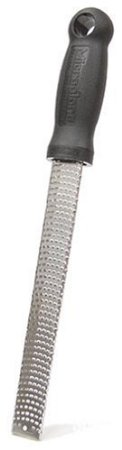
Microplane Zester, $12.38 - This is an absolute necessity for any cook. It zests citrus like a breeze, finely grates parmigiano reggiano into pillowy piles, grates tough ginger, and even zests dark chocolate for topping desserts. The blades are super sharp so you don't have to work hard to grate food. Every kitchen needs one. 

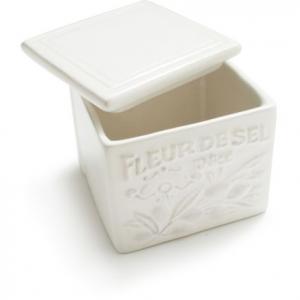
Provencal Stonewall Salt Crock, $12.95 - Nate got me this salt crock for Christmas last year and I love it. It's a small detail that's really improved the efficiency of my kitchen. Having it filled next to the stove makes grabbing a pinch of salt at a moment's notice so easy and it's perfect for dunking my measuring spoons in for baking. Also it's pretty and french. 

10" Lodge Cast Iron Skillet, $14.97 - Lodge skillets are made in the USA, affordable, reliable, and ever so necessary for every kitchen. We love cooking in cast iron. Cast iron gives great heat distribution, gets super hot for frying, and it easily works on the stove top, in the oven, and over a camp fire. So versatile. We make cornbread in it, fry eggplant, bake puffy pancakes, and latkes. We have a mini one which makes the perfect fried eggs as well as giant chocolate chip cookies for two. 

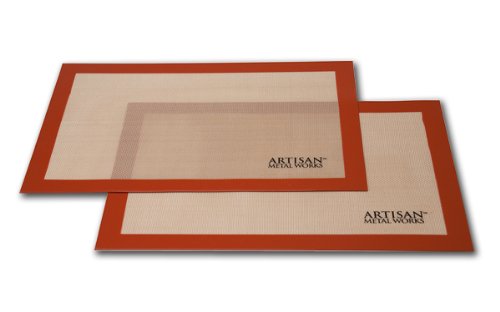
Silicone Baking Mats, $15.12 for two - I got these for Christmas last year and use them all the time. You'll never have to buy parchment paper or cooking oil again. Nothing sticks to these, and they make clean up a breeze. They are essential for cookies or baked goods of any kind. 

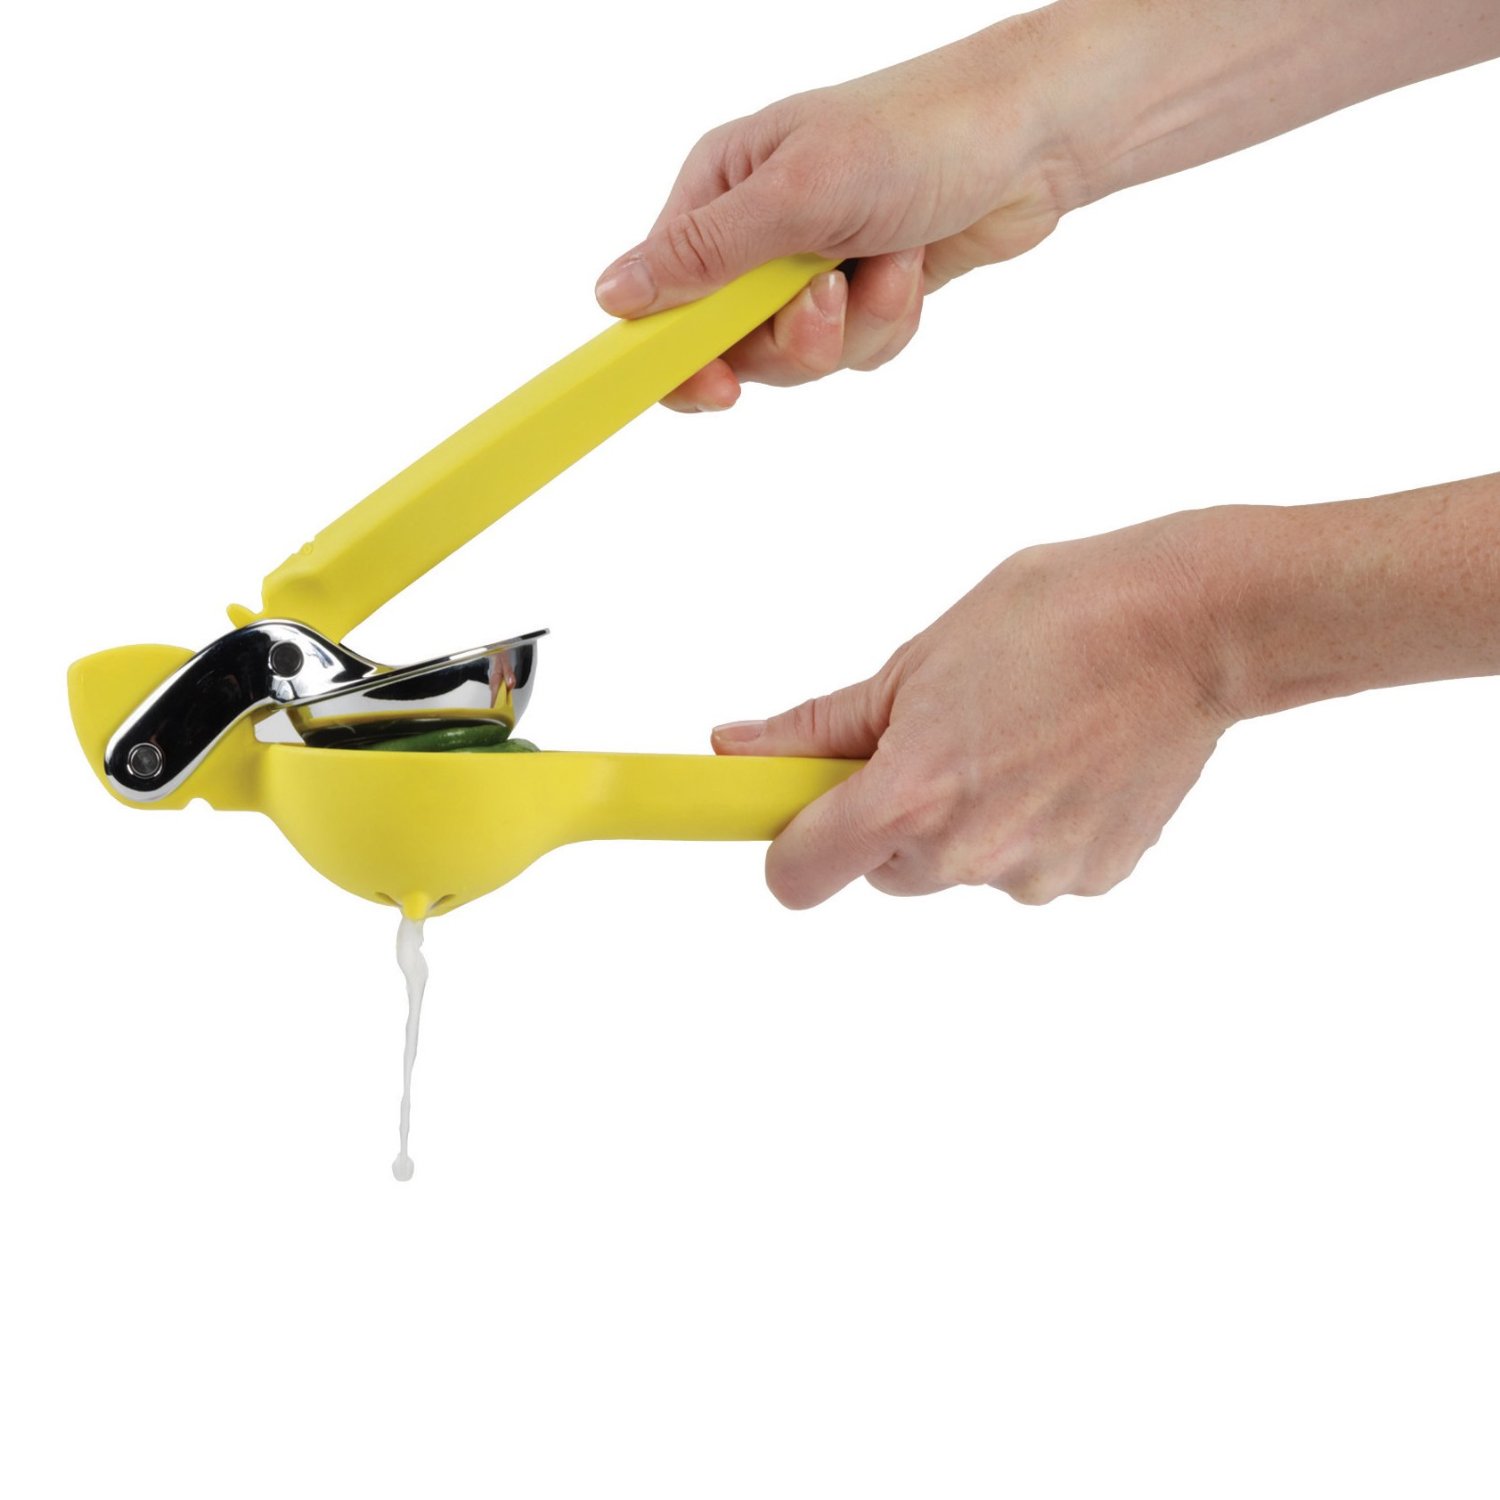
Chef'n Citrus Juicer, $23.08 - I put off buying this juicer for years. Somehow I just couldn't justify spending almost $25 for something as silly as a juice press. I finally splurged a couple months ago, and I use this thing every single day. It squeezes out every last bit of juice with just a gentle squeeze. It produces zero mess and is easy to clean. I'll never go back to anything else. 

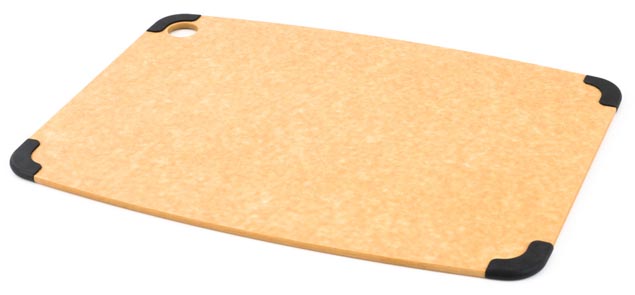
Non-slip Epicurean Cutting Boards, $24.99 - $39.99 - These cutting boards are fantastic. We have them in three sizes; they are high-quality, non-slip, and dishwasher safe. These boards won't dull your knives, and the best thing about them is they require zero maintenance. One good cutting board and a good chef's knife are probably the two most important things in a kitchen, period. 

Peugeot 7-inch Salt & Pepper Mills, Chocolate, $36.99 each - We bought these with money from our wedding about two years ago and love them. They are a great investment, really high quality and will last a lifetime. They live next to our stove and are used daily. The dark chocolate color is so classic and looks sophisticated and timeless on the table. 

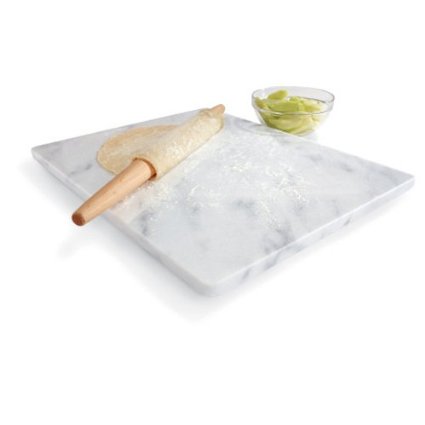
Marble Pastry Board, $44.95 - Although it's definitely not a necessity, I adore this pastry board. It lives on top of two of my burners, which provides much appreciated extra counter space. It's beautiful, sturdy, and perfect for the baker in your life. I never have to worry about clearing a space on the counter to roll out dough, I just toss some flour on this board and start rolling. This size fits perfectly in my fridge, which matters, because technically you want to have the option to pop it in there - you know, to keep those beautiful chunks of butter from melting in your pie crusts. Also, if you're into instagraming your culinary creations like I am, it makes the perfect background - no one will know you don't have fancy marble countertops!  

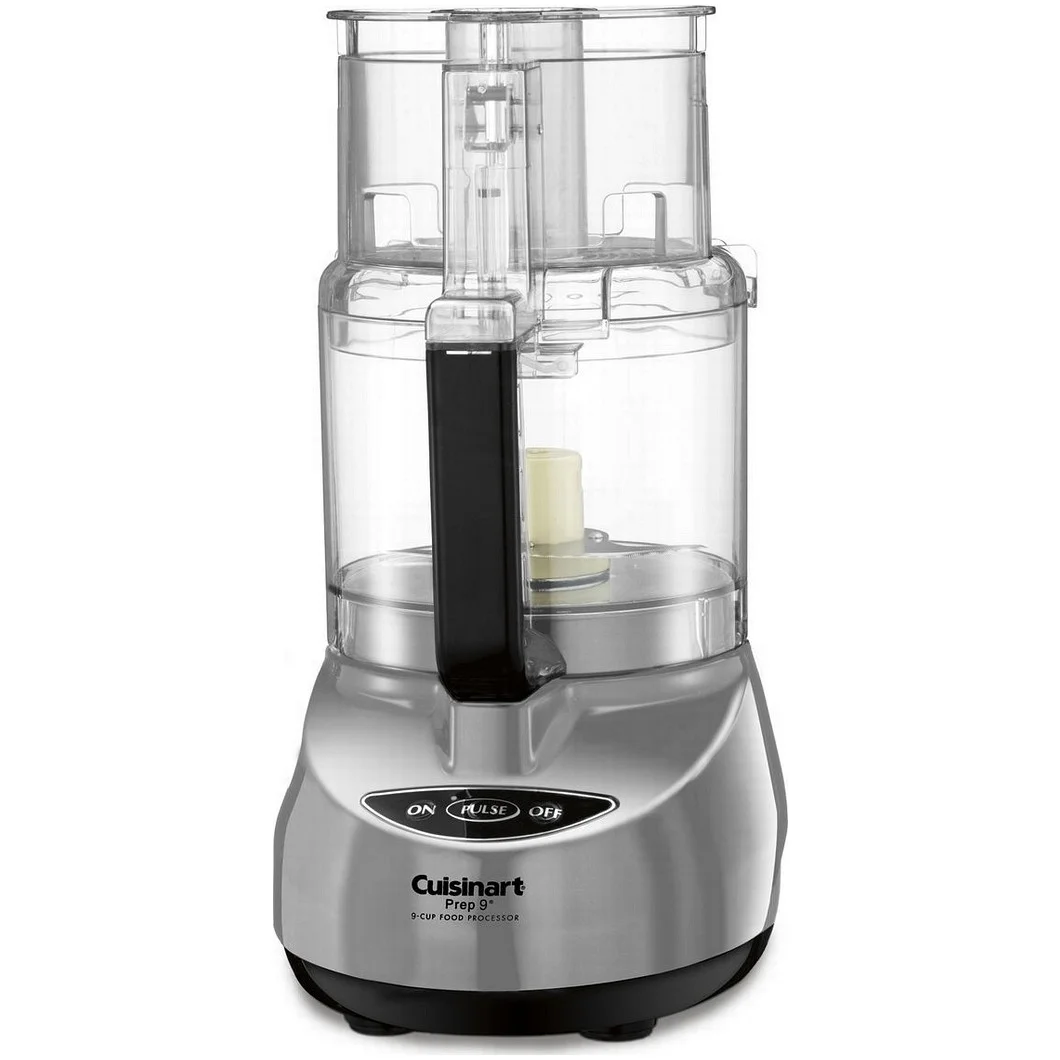
9-cup Cuisinart Food Processor, $149 - I use my food processor probably 3-5 times a week for everything from pureeing chickpeas for hummus and pulsing ingredients for falafel. It's essential for pie crust. The attachments grate cheese in seconds, shred potatoes for latkes, and zucchini for zucchini bread.  I don't know how I functioned before I owned a food processor. 

Advantage Components Pot Rack, $219 - I invested in this pot rack last summer because I found our pots and pans were getting scratched up after being shoved in a cabinet. They were also taking up precious storage space in our tiny kitchen. At the time, my husband thought it was a totally unnecessary purchase but after having it for almost two years even he admits our kitchen couldn't function without it. It's an easy way to create extra storage in a tight kitchen, it looks nice, and it doubles as a drying rack - just wash and hang! This particular one is expandable, so if one day we have a big kitchen we can expand it wider to fit the space. 

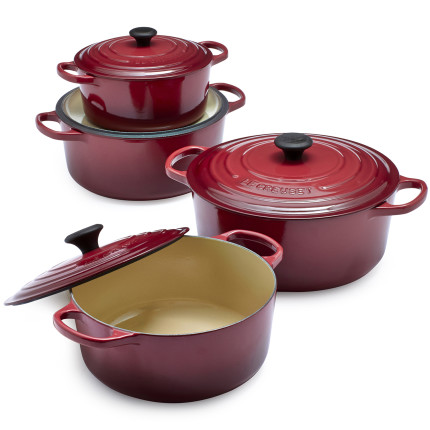
Le Creuset Dutch Ovens, $240 - $330 I am fortunate enough to have two of these beauties and I must say they are hands down my favorite thing about my kitchen. French-made, they are a gift that can be passed down generation after generation. If well-maintained, they will last forever. They are made of heavy duty cast iron so you get the even heat distribution and versatility of going from the stove to the oven to the table, but because of the enamel coating they require zero maintenance and are a breeze to clean. They are perfect for slow cooking, braising, frying, soups, and one pot meals. The moment the seasons change in the Fall, my Le Crueset makes its home almost permanently out on my stovetop. On top of all of this, the colors are gorgeous. I just splurged on a 3.5 quart in burgundy which is perfect for one pot meals for 2-4, cooking beans, hot chocolate, baked apples, or mulling cider and wine. I've had a 7.25 quart in Marseille which is a work horse - perfect for soup and stews, and large one pot meals. These make an incredible gift for any cook. 

Persimmon Pecan Crumble Bars {Vegan!}

Persimmon Pecan Crumble Bars {Vegan}| Kneading Home

The man and I are hosting a little holiday potluck this weekend, as if the holidays didn't give me enough of an excuse to bake my brains out. We got our tree, decorated our tiny apartment, and washed the dog - we're super excited about it.

I discovered vegan baking several months ago and every time I experiment with a new vegan recipe I feel amazed at what great things can be made with purely whole, plant-based foods. Seriously, dates, bananas, flax seeds, coconut oil - amazing stuff. So when I found out that not one, not two, but three vegans RSVPed to our potluck the first words that entered my mind were "I'VE GOT THIS!" 

Persimmon Pecan Crumble Bars {Vegan}| Kneading Home

I've been working on a vegan hot chocolate that is deadly good, stay tuned. And yesterday, inspired by the 8 persimmons that have been sitting in our fruit basket for weeks (those things last forever), I veganized my favorite crumble bars by smitten kitchen. It was surprisingly easy, and minus the time it takes to peel and dice the fruit, this recipe is a breeze. 

The persimmons are subtle and sweet and the crumble is addicting to say the least. These make a great holiday potluck dish, and if you're wondering, your meat-eating, vegan-skeptical friends will never be able to tell! 

Persimmon Pecan Crumble Bars {Vegan}| Kneading Home

Vegan Persimmon Pecan Crumble Bars 
Adapted from smitten kitchen
Fills a 9x13 inch pan with approximately 30 small bars 

For the crust + crumble: 
2 sticks vegan butter (I used Earth Balance) 
1 flax egg (1 tbsp flax seed meal, 3 tbsp water, 1/4 tsp baking powder)
2 cups all purpose flour 
1 cup rolled oats
1/4 cup toasted pecans, roughly chopped 
1 cup brown sugar, packed 
1/2 tsp salt 
1 tsp baking powder 
1/2 tsp cinnamon 
1/4 tsp nutmeg 

For the filling: 
10 small fuyu persimmons, (about 2.5 cups) peeled & diced 
2 tbsp lemon juice 
2 tbsp cane sugar 
1 tbsp corn starch 
1/4 tsp cinnamon 

Prep work: Chop the vegan butter into small cubes and place in the freezer for 20-30 minutes. Prepare the flax egg by whisking together flax seed meal, water, and baking powder in a small bowl, let sit for 20 minutes. 

Preheat the oven to 375 degrees. Line a 9x13 inch baking dish with parchment paper, making sure it covers the edges - this will make it easier to pull the bars out once their baked. Rub the parchment with excess butter or spray with coconut oil (I used Trader Joe's coconut oil spray). 

Prepare the filling. In a medium bowl, combine peeled and diced persimmons with lemon juice, sugar, corn starch, and cinnamon. Set aside. 

Prepare the crumble: In a large bowl whisk together flour, oats, pecans, sugar, salt, baking powder, cinnamon, and nutmeg. Add in cold butter cubes and flax egg. Using your hands (or a pastry cutter) to gently break up the butter pieces until the mixture looks like sand with large pea-sized butter chunks. 

Pour about 2/3 of the crumble into the bottom of the baking dish and press it down until it forms a solid crust. Top with the filling then sprinkle remaining crumble on top. Bake for 30-35 minutes. Let cool completely before cutting into squares. Refrigerate until cold and serve. 

Notes: 

  • Not vegan and want to use traditional ingredients? Use two sticks of real unsalted butter in place of the vegan butter, and 1 large egg in place of the flax egg. 
  • I think these taste best served cold, the crumble thickens and I feel like the flavors are brought out more, but you could totally serve these warm or room temperature, they will just be messier. 
  • I froze these for our party this weekend. I'll post an update, but I'd imagine they freeze great. 
  • Can't find persimmons? You can make these bars with pretty much any fruit. I've made over 4 flavors of smitten kitchen's bars, all of them varying just slightly. These things are so simple, feel free to experiment. 


Creamy Butternut Squash Goat Cheese Pasta with Brown Butter & Crispy Sage

Creamy Butternut Squash Goat Cheese Pasta with Brown Butter & Crispy Sage | Kneading Home

It's no secret I have a bit of a love affair with brown butter and sage. I was way too old the first time I experienced the dynamic duo last Christmas. I made homemade butternut squash gnocchi in a brown butter sage creme fraiche sauce and it was quite possibly the most epic and decadent meal I've ever made and oh so worthy for a first vegetarian christmas. I do submit that there is no better smell in the world than crispy sage cooking in bubbly brown butter. It's cozy, comforting, and so damn decadent. 

Creamy Butternut Squash Goat Cheese Pasta with Brown Butter & Crispy Sage | Kneading Home

So inspired by that dish I decided to make a simpler, more week-night appropriate version. The result is perfection. Creamy roasted butternut squash is puréed with tangy goat cheese and a dollop of creme fraiche. The sauce is then poured over pasta and topped with crispy sage and brown butter. It's holiday worthy, it's cozy, and it's so good.  

Creamy Butternut Squash Goat Cheese Pasta With Brown Butter & Crispy Sage | Kneading Home

Creamy Butternut Squash Goat Cheese Pasta with Brown Butter & Crispy Sage
Inspired by Chow 
Serves 4-6

1 large butternut squash
8 tablespoons (1 stick) unsalted butter, divided  
1 large bunch of sage, about 2 oz 
3 large shallots 
1 pound angel hair pasta 
1/8 tsp nutmeg 
3.75 oz creme fraiche 
2.5 oz goat cheese 
3/4 - 1 cup pasta water 
3/4 tsp salt 

Preheat the oven to 375 degrees. Slice butternut squash length-wise, remove the seeds (they are great roasted separately in olive oil) and discard the stringy center. Drizzle the squash with olive oil, sprinkle with salt and pepper, then cook on a baking sheet cut-side up for 45 minutes - 1 hour until completely soft and the top begins to look caramelized. Set aside to cool slightly. 

Meanwhile, warm 2 tbsp of butter in a medium skillet over medium heat and slice shallots (everything gets blended together so how you slice them doesn't matter much). Add the shallots to the butter and sauté until soft and just slightly browned. Pour cooked shallots into a blender. 

Bring a large stock pot of salted water to a boil. Warm the remaining 6 tablespoons of butter over medium low heat. The butter will warm and white bubbles with appear. Just as the bubbles begin to subside add in whole sage leaves. The sage will start to become crispy, and the butter will start to turn a rich caramel color with little brown bits. Watch like a hawk as this happens as brown butter turns to burnt butter quickly. I like to bring the brown butter right to the edge of burnt to get it as caramelly with as many brown bits as possible.  

Once water is boiling, add the pasta and cook. Reserve 1 cup of pasta water for the sauce and place drained pasta in a sauté pan. 

Once it's cooled enough to handle, scrape out the center of the butternut squash with a spoon and add it to the blender. Add the nutmeg, creme fraiche, and goat cheese and blend. Slowly add in pasta water, starting with 1/2 a cup and adding more until you reach your desired thickness. Add salt and pepper to taste. Pour the sauce over the pasta and toss. Once combined, top with brown butter and sage and toss lightly with tongs as not to break the sage leaves. Top with parmesan and serve. 

Notes: To blend I used my vitamix but any blender should work, as well as a food processor. I've made this with homemade pasta and dried. It's approximately twice as good with homemade, but I realize normal people don't have that kind of time.