Grilled Pineapple Salsa

Grilled Pineapple Salsa | Kneading Home

After we found out we're moving to Chicago, Nate and I came up with a california bucket list of things to do before we move. Although we've been less than loving LA for a while now, it's a bit unnerving to think we may never come back to the city we live in again. I may never visit our Trader Joe's or take class at my yoga studio or spend a date night at our favorite Indian restaurant ever again. I know, I'm being a bit dramatic, but once we pick up and leave we're closing this chapter of our lives, a chapter we're happy to close. But there's something about closing a chapter that brushes over the rough parts and washes over everything with nostalgia. 

I know this because when I think of the 5 years I spent living in New York, I don't remember the roaches or cursing MTA as I'm late for class and the damn train won't come. I remember the best days of my life in what I still fiercely describe as the greatest city in the world. I remember being surrounded by friends, brilliant teachers, and the pulse of a vibrant city packed with more charm than Los Angeles could ever muster. 

Grilled Pineapple Salsa | Kneading Home

It's also a bit unnerving how much where you live changes you. Los Angeles has made me softer, that's for sure. I look back on the person I was when I first moved here over 3 years ago and I barely recognize her. It's both scary and exciting to think about the person I'll become as a Chicagoan. As a mid-westerner (something that still continues to fill my mind with stereotypes that don't feel like me). What will my life be like? What will I be like? 

I recently told Nate that after we move I want to spend the first few weeks cooking the meals we already know and love. And how comforting I imagine it will be to eat the same crispy eggplant with mango salsa we've been eating for years. He doesn't relate to any of this because he moved every two years growing up. He has quite literally mastered moving on. He doesn't have friends from childhood or a hometown and because of it he is the most adaptable person I know. 

Grilled Pineapple Salsa | Kneading Home

So in effort to savor these last couple months and check some things off our list, we headed up to Ventura last weekend and ate at Beach House Tacos on the pier. We went there the morning we got engaged, so it's sort of special to us. They sell the cheapest best tacos I've ever had, hands down. They definitely have that street taco feel - no fuss, simple, good. So last weekend we ordered a side of grilled pineapple salsa for the first time. Spicy roasted tomato salsa with thick chunks of juicy grilled pineapple. I barely finished chewing my first bite before I said, "WE HAVE TO MAKE THIS". 

Cinco de Mayo is here so what better time? I'd never made a salsa like this before, so I figured why not go with the pro, Rick Bayless, whose famous Chicago restaurant XOCO we ate at the night I interviewed. This recipe starts with simple whole ingredients. Instead of using canned fire roasted tomatoes, I roasted them myself. It's really super simple. Dry roast everything on a sizzling hot cast iron skillet until blackened. Peel off the skins and blend into chunky salsa goodness with a surprising bite of juicy sweetness from grilled pineapple. It is taco stand worthy, simple, authentic, and delicious. 

Grilled Pineapple Salsa | Kneading Home

Grilled Pineapple Salsa 
adapted from Rick Bayless via The Splendid Table 
makes about 1 quart 

1 pound fresh tomatoes (I used greenhouse tomatoes on the vine) 
2 large jalapeños
3 garlic cloves, unpeeled 

1/2 teaspoon salt, divided 
1/2 white onion ~ 3 oz, finely diced 
1/3 - 1/2 cup chopped cilantro 
1 small pineapple, or 1/2 large pineapple 

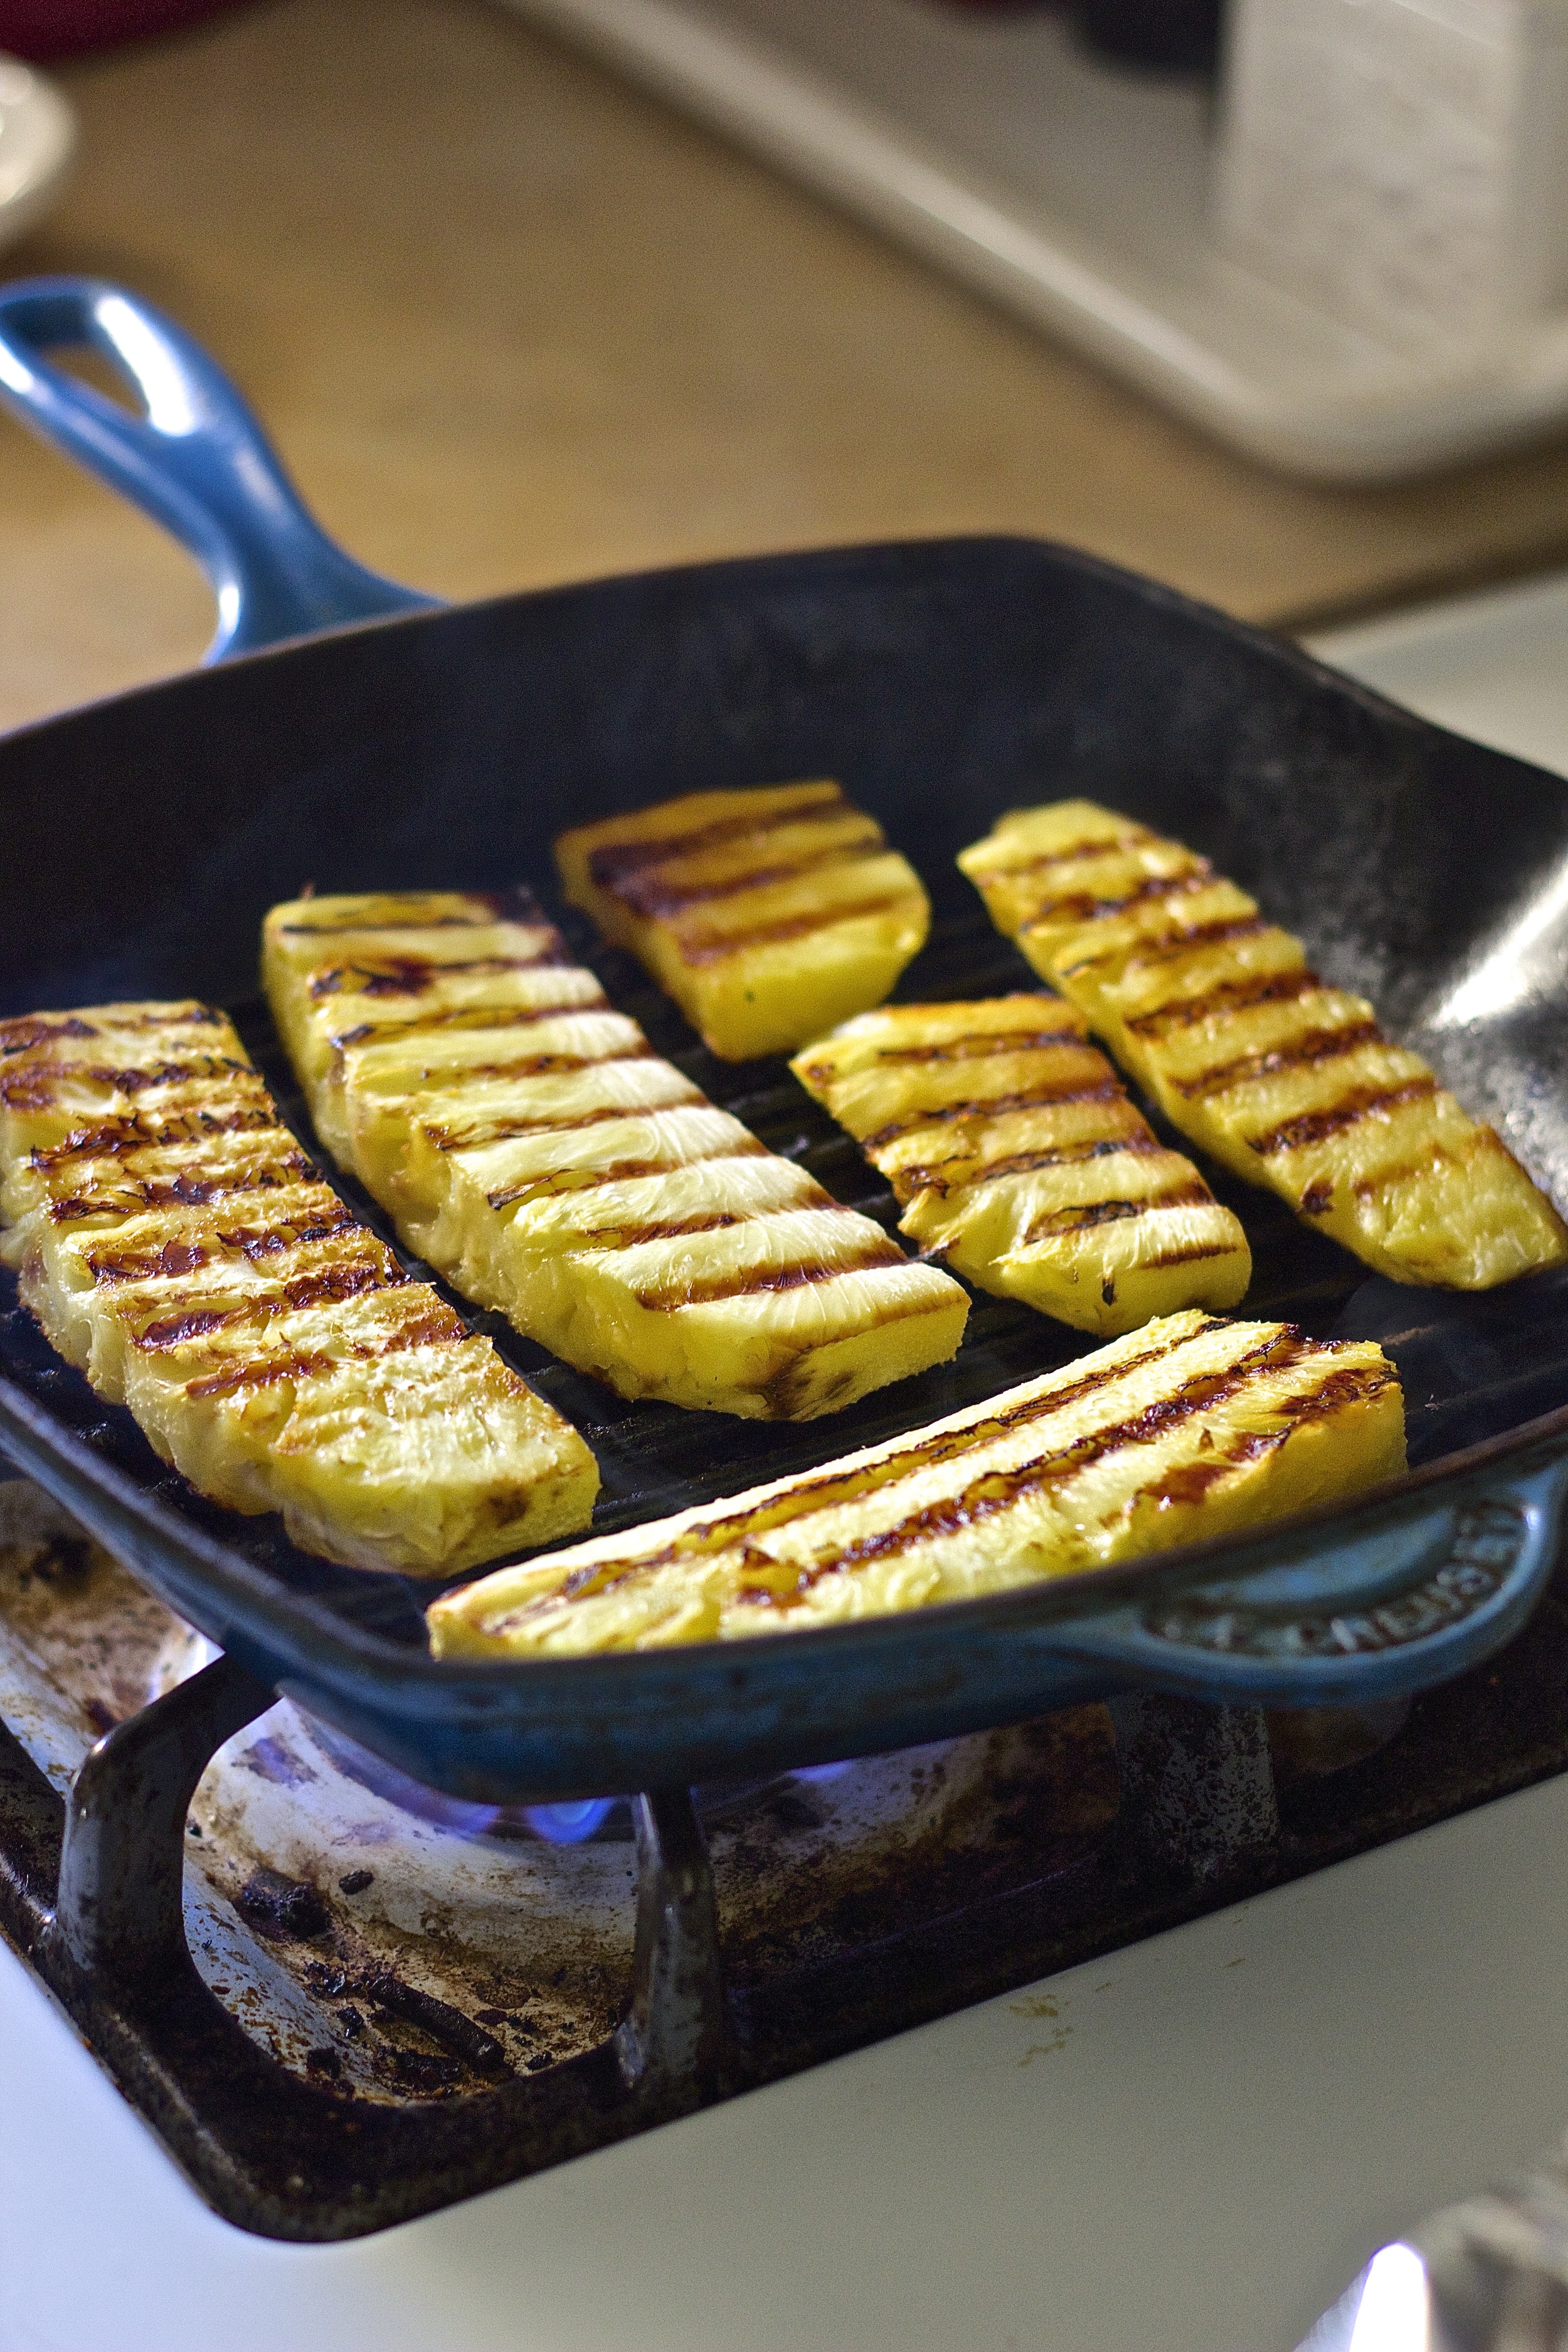
Heat both a large cast iron skillet covered in tin foil and a grill pan over high heat. You could also use a regular grill. Remove the rind, and cut the pineapple in long, 1/2 inch thick slices. 

Place tomatoes, jalapeños, and unpeeled garlic in the cast iron skillet, place the slices of pineapple in the grill pan and reduce the heat to medium. Cook the pineapple until dark brown grill marks appear on the bottom, then flip, about 12 minutes on each side - though it will depend on the temperature of your grill. Rotate the tomatoes, garlic, and jalapeños every couple of minutes until they are soft, blistered, and blackened almost all over. For me, this took about 25 minutes. It's okay if the tomato skins stick to the foil. Remove from the skillets and let everything cool.  

Meanwhile, run cold water over the diced white onion and set aside. Roughly chop the cilantro. 

Remove the skins from the tomatoes, jalapeños, and garlic. Discard the jalapeños stem and if you like your salsa mild remove and discard all of the seeds. I left about a dozen seeds and it was pretty spicy - so a little goes a long way. 

In the bowl of a food processor pulse the jalapeños, garlic and 1/2 teaspoon of salt until completely ground. You will need a scape the sides a couple times. Add the tomatoes pineapple and pulse until desired chunkiness is achieved. Transfer the salsa to a bowl and stir in the onion and cilantro. Let sit at room temperature for at least 3 hours to let the flavors marinate. The flavors only get better with time.  


Homemade Horchata {dairy-free}

Homemade Horchata {dairy-free + naturally sweetened} | Kneading Home

I've always been such a sucker for good horchata. And despite the fact that I'm now the proud owner of an Irish last name, my middle name's still Montes, and I'm still 1/2 hispanic. Also cinco de mayo is like really soon. 

I love the fact that horchata is naturally dairy-free. It's the perfect combination of creamy and refreshing; definitely a treat. And until yesterday I had never made my own. I did a bit of research and found 1. it's super simple. 2. basically all of the recipes call for the same ingredients, just varying in their proportions 3. it's shockingly similar to homemade almond milk, though much more flavorful. 

Homemade Horchata {dairy-free + naturally sweetened} | Kneading Home

Basically you soak almonds, rice, water and a cinnamon stick overnight, blend them all up the next morning (yes, cinnamon stick and all. I was skeptical too), pour the mixture through a cheese cloth, add water, sweeten, and wah lah! The result is much creamier and much more decadent than what you would get in a restaurant. 

Homemade Horchata {dairy-free} 
Makes 4.5 cups 

2/3 cup uncooked long grain brown rice (see notes), washed 
1 1/4 cup almonds, blanched 
4 1/2 cups water, divided 
3" cinnamon stick 
1/4 cup plus 1 tablespoon agave, or sweetener of your choice
1/4 teaspoon vanilla extract (optional) 
cinnamon for garnish

If you are unable to find blanched almonds (skins removed), boil a medium pot of water and toss your almonds in for about 1 minute. Transfer the almonds to a bowl of cold water and pop off the skins. Note - this is actually the most time-consuming part of the whole recipe. 

Place rice, blanched almonds, 2 1/2 cups hot water, and the cinnamon stick in a medium bowl. Cover, and let sit over night or up to 12 hours. Pour the ingredients into a high powered blender and blend until completely smooth (yes cinnamon stick and all). Pour the mixture through a fine mesh strainer/cheese cloth/milk bag (I used a milk bag) and discard the pulp. 

Pour the liquid back into your blender, add two cups of cold water, vanilla, and agave. I recommend starting with about 1/4 cup agave then adding more one tablespoon at a time if desired. I found 1/4 cup + 1 tablespoon was enough for me but if you're used to the super sweet restaurant style you could add up to a cup. 

Serve over ice with a generous dusting of cinnamon. 

Notes: 

  • I used long grain brown rice but you could use any type of white or brown long grain rice. What exactly is long grain rice? I had the same question. Examples include basmati, carolina, jasmine, or texmati. The Kitchn has a great article discussing a taste test they did using different types of rice. They concluded that brown rice provided a more nutty flavor, while the white tastes more authentic but a bit chalky. Feel free to try whatever you have on hand. 

  • I couldn't decide whether I liked the horchata with or without the vanilla extract, so it's totally optional. 

  • You could definitely sweeten with maple syrup or honey instead of agave. I even considered coconut sugar. If you wanted to, you could use regular sugar, though I'd probably recommend incorporating it into a simple syrup with some of the water.  

  • I want to find a way to re-use the leftover almond/rice/cinnamon mixture. I'm thinking bread pudding of some sort? Has anyone ever done anything like this?


Broccoli, Quinoa, & Feta Fritters

Broccoli, Quinoa & Feta Fritters | Kneading Home

First I want to say thank you for all the love and support we've received regarding our move to Chicago. Seriously, thank you. We are so excited. Other than that, we've had a pretty low-key week. Pumpkin and Nate ordered coats that arrived in the mail yesterday, pretty cute

Over the past couple of weeks I've attempted meal planning, where Nate and I tag-team meal prep and we buy all the ingredients sunday afternoon. You know, plan ahead so we don't end up saying "screw it, lets go to Sharky's". Dinner gets complicated when you work 3 nights a week. Is it weird that I gauge success based on how many meals we've cooked at home that week? Thank you, Pinterest

Broccoli, Quinoa & Feta Fritters | Kneading Home

I tested these fritters several weeks ago but perfected them last night. I'm a big fan of fritters. They are an especially tasty way to eat vegetables and whole grains. They make a tasty little appetizer for a crowd, or a perfect meat-free main for a week night. I'd imagine they'd also be a pretty easy way to sneak a pound of broccoli into a kid (shhh, I won't tell!). They also feel very springy, if artichokes don't qualify as a meal, I assure you artichokes with a side of fritters definitely do! 

So these guys are about 80% broccoli and quinoa which means they are loaded with health benefits. Hello fiber. Hello protein. They have chopped green onions for zest and lightness and crumbled feta for salty creamy flavor. Serve them with a few generous slices of avocado, a dollop of greek yogurt, and a sprig of fresh cilantro and you've got dinner. 

New to cooking with quinoa? Check out this great article to learn more about the science behind this super food.

Broccoli, Quinoa & Feta Fritters | Kneading Home

Broccoli, Quinoa + Feta Fritters 
Makes about 12; serves 4-6 as a main 

For the fritters:
1 cup uncooked quinoa 
1 2/3 cup water
1 pound broccoli 
4 spring onions, diced 
6 oz (~1 heaping cup) crumbled feta 
1/3 cup grated parmesan 
1 1/2 teaspoons salt 
1/2 cup all-purpose flour (or flour of your choice) 
3 large eggs 
coconut oil for frying

For garnish: 
fresh cilantro 
greek yogurt 
avocado 

Warm water in a small saucepan, meanwhile using a fine mesh strainer rinse your quinoa. Place quinoa in water and bring to a boil. Cover, reduce to a simmer and cook for 15 minutes. After 15 minutes remove from heat and keep covered for 5 minutes.

While the quinoa is cooking prepare the other ingredients. Bring a large pot of water to a boil. Chop broccoli into 1/2 inch florets. Cook broccoli in the boiling water for 4-5 minutes until bright green and a fork easily pierces through the pieces. Remove from water immediately as not to over-cook and transfer to a large bowl. Meanwhile heat a cast iron skillet over medium heat. Toss cooked quinoa, spring onions, feta, parmesan, and salt with the broccoli. Add eggs and flour and stir until completely combined.  

Pour just enough coconut oil to very thinly coat the bottom of the cast iron skillet. We're talking 1-2 tablespoons max. By now your skillet should be very warm. You can test it but splashing a little drop of water in the hot oil - it should sizzle. Scoop a heaping 1/3 cup of batter into the skillet and using a spatula, shape the batter into patties, then press down to compact the batter as it cooks. Repeat with remaining fritters.

Only when the bottom of the fritter is very dark brown, almost burnt, flip it over and cook the other side; cooking about 4 minutes on each side. If you flip it before this it will probably fall apart and the inside will be soggy. You want to get that nice crispy dark sear. Once both sides are cooked, remove from skillet and place over a paper-towel to absorb any excess oil (if your pan is hot enough, there really shouldn't be much). 

Repeat with remaining batter, adding oil as needed. Serve fritters with a dollop of greek yogurt, sliced avocado, and a few sprigs of cilantro. 

Notes:
Gluten-free option? I see no reason why you couldn't use gluten free flour instead of all-purpose. Whole wheat could even work, though it may affect the taste. As you probably know, in addition to its many qualities, quinoa is naturally gluten-free! 

These are definitely best on day 1. If you are going reheat them, avoid the microwave and either warm them in a frying pan or wrap them in foil and throw them in the toaster.